多年前初次接触makefile,这里复习下。
https://maxwell-lx.vip/basic-usage-make/
https://zhuanlan.zhihu.com/p/92010728
https://zhuanlan.zhihu.com/p/350297509
Makefile是什么
可以理解为一个自动化的编译脚本,避免繁琐的手动编译过程,类似shell脚本。
从小例子入手
(1)新建项目文件夹hello,及文件main.cpp,factorial.cpp,printhello.cpp,functions.h。
hello目录的结构如下:
1
2
3
4
5
| hello/
├──main.cpp
├──factorial.cpp
├──printhello.cpp
└──functions.h
|
main.cpp
1
2
3
4
5
6
7
8
9
10
11
12
13
14
| #define _FUNCTIONS_H_
#include <iostream>
#include "functions.h"
using namespace std;
int main()
{
printhello();
cout << "This is main:" << endl;
cout << "The factorial of 5 is:" << factorial(5) << endl;
return 0;
}
|
printhello.cpp
1
2
3
4
5
6
7
8
9
| #include <iostream>
#include "functions.h"
using namespace std;
void printhello()
{
int i;
cout << "Hello World!" << endl;
}
|
factorial.cpp
1
2
3
4
5
6
7
8
9
| #include "functions.h"
int factorial(int n)
{
if (n==1)
return 1;
else
return n * factorial(n-1);
}
|
function.h
1
2
3
4
5
| #ifdef _FUNCTIONS_H_
#define _FUNCTIONS_H_
void printhello();
int factorial(int n);
#endif
|
(2)那么我们一般手动执行的命令为:
1
2
| g++ main.cpp factorial.cpp printhello.cpp -o main
./main
|
这种方法适用于小型项目。对于大型项目来说,此法编译效率低,
(3)新建Makefile
1
2
| hello: main.cpp printhello.cpp factorial.cpp
g++ -o hello main.cpp printhello.cpp factorial.cpp
|
在命令行上直接运行make命令就能出现hello可执行文件
Makefile解析
大致了解一个Makefile
对于一个初学者,大概浏览一个makefile:
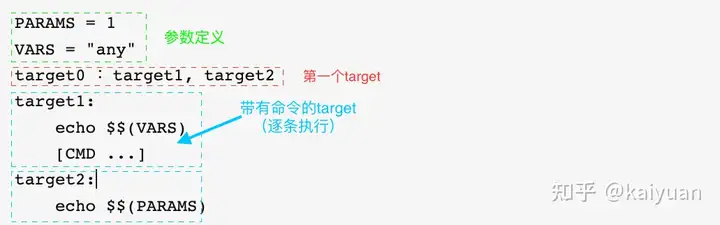
1、区分前处理/变量处理(根据规则定义或处理参数) 。
2、找到target: 包含了冒号(colon :)。arget都是顶格抒写的, “ : <***> “ , target下面的带[tab]缩进的行,就是它包含的命令,找到所有的target。
3、执行target: 一般是实现第一个target,(也可以用make 指定,如make clean,就只执行”clean” 这个target)。
Makefile的语法
简单的分为三个部分:目标、依赖、命令
- 目标:规则的目标,可以是 Object File(一般称它为中间文件),也可以是可执行文件,还可以是一个标签;
- 依赖:可以是生成 targets 需要的文件或者是目标。可以是多个,也可以是没有;
- 命令:make 需要执行的命令(任意的 shell 命令)。可以有多条命令,每一条命令占一行。
工作原理
从第一个target开始,检查它的依赖是否都存在,如果存在的话就执行当前target下的命令。
否则就往下查找,寻找新规则生成依赖。
实战
version1
1
2
| hello: main.cpp printhello.cpp factorial.cpp
g++ -o hello main.cpp printhello.cpp factorial.cpp
|
版本1就相当于普通的编译命令。
version2
1
2
3
4
5
6
7
8
9
10
11
12
13
14
15
| CXX = g++
TARGET = hello
OBJ = main.o printhello.o factorial.o
$(TARGET): $(OBJ)
$(CXX) -o $(TARGET) $(OBJ)
main.o: main.cpp
$(CXX) -c main.cpp
printhello.o: printhello.cpp
$(CXX) -c printhello.cpp
factorial.o: factorial.cpp
$(CXX) -c factorial.cpp
|
版本2分离编译器、目标、对象,但是还是不够智能。增加一个cpp文件需要改动的地方很多。
version3
1
2
3
4
5
6
7
8
9
10
11
12
13
14
| CXX = g++
CXXFLAGS = -c -Wall
TARGET = hello
OBJ = main.o printhello.o factorial.o
$(TARGET): $(OBJ)
$(CXX) -o $@ $^
%.o: %.cpp
$(CXX) $(CXXFLAGS) $< -o $@
.PHONY: clean
clean:
rm -f *.o $(TARGET)
|
版本3引入了自动变量、通配符、.PONY。
(1)自动变量小撇:
- $@ 目标名
- $^ 所有依赖的文件名
- $< 第一个依赖的文件名
(2)通配符%,匹配0个或多个任意字符。
(3).PHONY的作用比较特殊,跟在它后面的目标都被称为伪目标。
如果 make 伪目标,不管该目录下是否有伪目标同名的文件(即使有也不会产生冲突),都会执行执行伪目标的依赖的命令。
version4
1
2
3
4
5
6
7
8
9
10
11
12
13
14
15
16
| CXX = g++
TARGET = hello
SRC = $(wildcard *.cpp)
OBJ = $(patsubst %.cpp, %.o, $(SRC))
CXXFLAGS = -c -Wall
$(TARGET): $(OBJ)
$(CXX) -o $@ $^
%.o: %.cpp
$(CXX) $(CXXFLAGS) $< -o $@
.PHONY: clean
clean:
rm -f *.o $(TARGET)
|